This tiny duck looks simple — but it is one of those embroidery projects that instantly feels special.
If you want to try ITH plush toy embroidery, this project is a great place to start.
The duck is soft, lightweight, beginner-friendly, and made in separate parts, which makes the full process much easier to understand.
You can download the free file here:
ITH Plush Duck Toy – Free Embroidery Design No. 42
In this tutorial, I show you exactly how to make it step by step.
Step 1 – Stitching the wings
Start with the wing file.
Hoop your yellow plush or fleece together with stabilizer.
The machine first stitches the placement line for the wing.

Once that is done, trim the stabilizer close to the stitched shape.
This helps reduce bulk and keeps the final wing cleaner.

Next, add a soft padding layer.
I used a thicker fleece here, but a new cleaning cloth also works surprisingly well and is a very budget-friendly option.
Then place another layer of yellow plush on top and cover everything with water-soluble topping.
This is important because plush fabric can swallow stitches if you do not stabilize the surface.

Now the machine stitches the final satin outline of the wings.
This gives the wing its clean edge and holds all layers securely in place.

After stitching, cut the wings out close to the edge.
At this point, your wings are finished and ready for assembly.

Step 2 – Stitching the beak and feet
The beak and feet are made in a very similar way.
This is one reason why this ITH plush toy embroidery project is so beginner-friendly: once you understand the first file, the next file already feels familiar.
Hoop your pink plush fabric with stabilizer.

Again, start with the placement line, then add your padding layer.

Then place the top fabric and cover it with topping so the stitches stay visible and do not sink into the plush.

Once everything is stitched, cut out the feet and beak neatly.
Now all smaller pieces are ready.

Step 3 – Stitching and assembling the body
Now it is time to build the duck body.
Hoop the yellow plush again.
The first visible detail stitched here is the eye area. I recommend using topping again so the small details stay clean and visible.


Next, the machine stitches the body outline and marks the placement for the wings, beak, and feet.
Attach the wings first, then the beak, then the feet.
A very nice detail in this design is that the attachment stitches work from the center outward. That reduces shifting and gives a cleaner final look.

After all parts are attached, place the back layer of plush on top.
The machine then stitches around the duck, leaving a turning opening at the bottom.

Now cut the body out carefully. Zigzag scissors work well here because they help reduce bulk around the edge.


Turn the duck right side out through the opening.
Then stuff it until it feels soft but nicely shaped.

Close the opening with a ladder stitch or mattress stitch by hand.
That final step gives the duck a neat and professional finish.

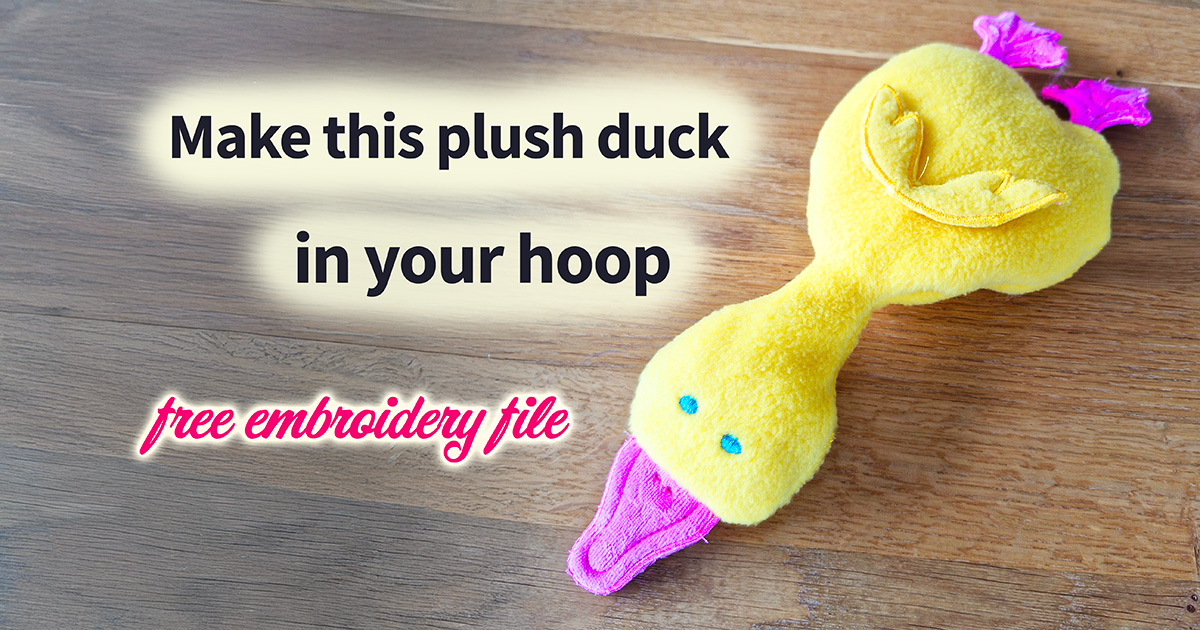
And here is the finished plush duck.


More ITH plush ideas
If you enjoy this kind of project, these other soft embroidery designs might be a great next step.


Why ITH plush embroidery is so addictive
Once you start making ITH plush toy embroidery projects, it is hard to stop.
They are:
- quick to stitch
- easy to personalize
- perfect as gifts
- small enough for fabric scraps
Even a simple little duck can feel like a small handmade treasure when it is finished.
FAQ – ITH Plush Toy Embroidery
What does ITH mean in embroidery?
ITH stands for In The Hoop.
That means most of the project is stitched and assembled directly in the embroidery hoop.
Can I personalize the plush duck embroidery design?
Yes, you can easily personalize this ITH plush duck.
For example, you can embroider a child’s name onto the belly of the duck.
Just make sure to add the name before placing the final front layer of the body.
This way, the personalization becomes a seamless part of the design and gives your duck a very special, handmade touch.
Is this duck embroidery project beginner-friendly?
Yes.
Because the duck is split into separate files for wings, feet and beak, and body, the process is easier to understand than many larger ITH projects.
Which fabric works best for ITH plush toy embroidery?
Soft fabrics like plush, fleece, minky, or terry work very well.
They give the finished project a soft and cuddly feel.
Why should I use topping on plush fabric?
Plush fabric is fluffy, so stitches can sink into the surface.
A water-soluble topping helps keep the embroidery details clear and visible.
What can I use as padding inside the wings and feet?
You can use fleece, batting, or even a new cleaning cloth.
All of these can add a soft padded effect inside the stitched parts.
Why are the pieces stitched from the center outward?
That method helps reduce shifting.
It keeps wings, beak, and feet in a more stable position while they are being attached.
How do I close the turning opening neatly?
A ladder stitch or mattress stitch is the best choice.
It closes the opening by hand and is almost invisible from the outside.
Where can I download the free duck embroidery file?
You can download it here:
ITH Plush Duck Toy – Free Embroidery Design No. 42


Leave A Comment